

Try Hyprune
Hyprune is an early preview. It runs on the current Hyprland release and the one before, with a core build for each, because the core plugin is built against one compositor’s ABI (Supported Hyprland versions). Everything is public on GitHub and installs without accounts or tokens. It’s an early preview: expect rough edges, and keep the nested session below for testing development builds.
The quickest look needs no install at all: Try it in 5 minutes opens Lumen Reach in a window from one folder.
Install paths
Section titled “Install paths”The meta repository hyprune/hyprune is the front door; its README has every option in detail. It bundles core, shell, SDK and worlds into kits:
| Kit | What you get |
|---|---|
lumen-reach |
The four Lumen Reach homes with terminals on their walls; High graphics, or the intel tier for an iGPU |
minimal |
One quiet home with a terminal and a workspace wall; 12 triangles, no textures, reduced motion |
dev |
The Switchyard test world plus a debug home and SDK tools |
- Nix profile (any Linux):
nix profile install github:hyprune/hyprune#kit-minimal, thenhyprune-setup install, log out, and starthyprune-sessionfrom a TTY. - NixOS or Home Manager: import the module and set
programs.hyprune = { enable = true; kit = "lumen-reach"; };. The module pins the same compositor the plugin was built for, plus its matching portal. - Arch:
./install.sh --kit minimal --dry-run, then without--dry-run. The script checks the compositor and header versions, builds the pinned components and never edits your Hyprland config without showing the diff and asking first.--uninstallreverses it.
Fedora and Debian packages aren’t available; use Nix there. World packages are published as GitHub releases and pinned by hash. Lumen Reach 0.12.0 (world format 0.9: a resident in each area walks its route, stops in front of a screen, sits on its bench and talks when you press E; Crimson marks the way to Rime Vault and Ember walks you to Signal Rise) and Switchyard 0.1.2 are the current releases. The official starter kit 0.2.0 adds placeable residents, machines and three gauges you can feed from a script (Director → Objects), on hyprune/worlds.
World and extension authoring tools
Section titled “World and extension authoring tools”The SDK and the schemas are published on npm. You don’t need a Hyprune session to use them:
npm i -g @hyprune/sdk # the hyprune and hyprune-mock commandshyprune world validate path/to/world # schema, files, glTF and provenance checkshyprune world pack path/to/world # a deterministic .tar.zst packagehyprune ext new widget my-widget # scaffold an extensionhyprune-mock --demo # a development daemon to build a shell or extension againstJust the schemas and validator: npm i -D @hyprune/schema, then npx hyprune-validate world world.json - 0.7. The schema reference documents every version.
A nested developer session
Section titled “A nested developer session”Core’s developer tools run everything inside a nested Hyprland window, so your real session is never touched. From a core checkout:
dev/hyprune-dev up # build, run acceptance, keep the nested session opendev/hyprune-dev smoke # acceptance onlydev/hyprune-dev record # acceptance with a screen recordingEach nested session holds an exclusive lock, and its controller only targets the child compositor. Test new core builds this way first. Some failures can only appear on real hardware, such as hardware-cursor and DRM output transitions. These need a supervised live session, with a checklist in core.
Your first ten minutes
Section titled “Your first ten minutes”With the lumen-reach kit:
- Enter the world with Super+F12. F12 always returns to the ordinary desktop.
- Walk and look. Use WASD, HJKL or the arrows, and move the mouse to look. Shift runs, Space jumps (or climbs in flight), Ctrl crouches (or descends), V toggles noclip and F4 flight.
- Hold Tab for one second to open the Director. Its tabs include Map (waypoints, travel, autodrive), Places, Surfaces, Workspaces, Help, What’s new and Settings. Escape closes it.
- Go home. Super+1 takes you to Sun Court, the home of workspace 21. Super+2 to Super+4 reach Array Hall, Rime Vault and Signal Rise. Windows on a workspace appear on its home’s main wall.
- Use a window in place. Aim at it and press E. Keystrokes go to the app. F brings it to native 2D. Super+Tab or Back returns to the world.
- Carry and pocket. Hold Super+left mouse to carry an aimed window up to 15 m away, then Super+wheel to change its distance. A window grabbed from behind turns to face you. Released over a tool mount such as a lectern, it snaps into the frame, which highlights first. Tool 5 (Placement) pockets windows with the middle button and places them ahead with the left button or onto a surface with the right.
- Free cursor. From the world, Super+Tab gives you a real cursor while the camera freezes. Press it again to return.
The full binding tables are on the keymap page. Bindings live in ~/.config/hyprune/input.json and reload live; the Director’s Settings tab edits them too. The settings preset (Automatic, Low, Medium, High, Ultra or USB-C laptop), the upscaler (FSR 1 or bilinear) and the optional dGPU offload are in Settings → Display & performance; the field of view (30–120°, default 65°) is in Settings → Movement & camera. On machines with more than one GPU, offload picks a discrete GPU that isn’t driving the display and scales its power cap to that GPU.
Player settings
Section titled “Player settings”The Director’s Settings tab lists its categories on the left (Display & performance, Movement & camera, Controls & keys, HUD & reticle, World & characters, Guidance & focus, Data sources, Recording, Accessibility, Advanced) under one preset. A setting you change gets a dot and a ↺ button back to the preset’s default, and it stays when you switch presets; Reset all… clears every change. The player settings (field of view, speeds, view bob, reach and the reticle) apply immediately and only changed values are saved, to ~/.config/hyprune/player.json:
- Movement: walk 4.0 m/s and run 10 m/s by default; view bob off, subtle (default) or normal.
- Reach: how far your hands work. Window gestures such as carry and resize reach 15 m, snapping into tool mounts 8 m, and placing, pocketing and path points 12 m. Clicking into a window has no limit.
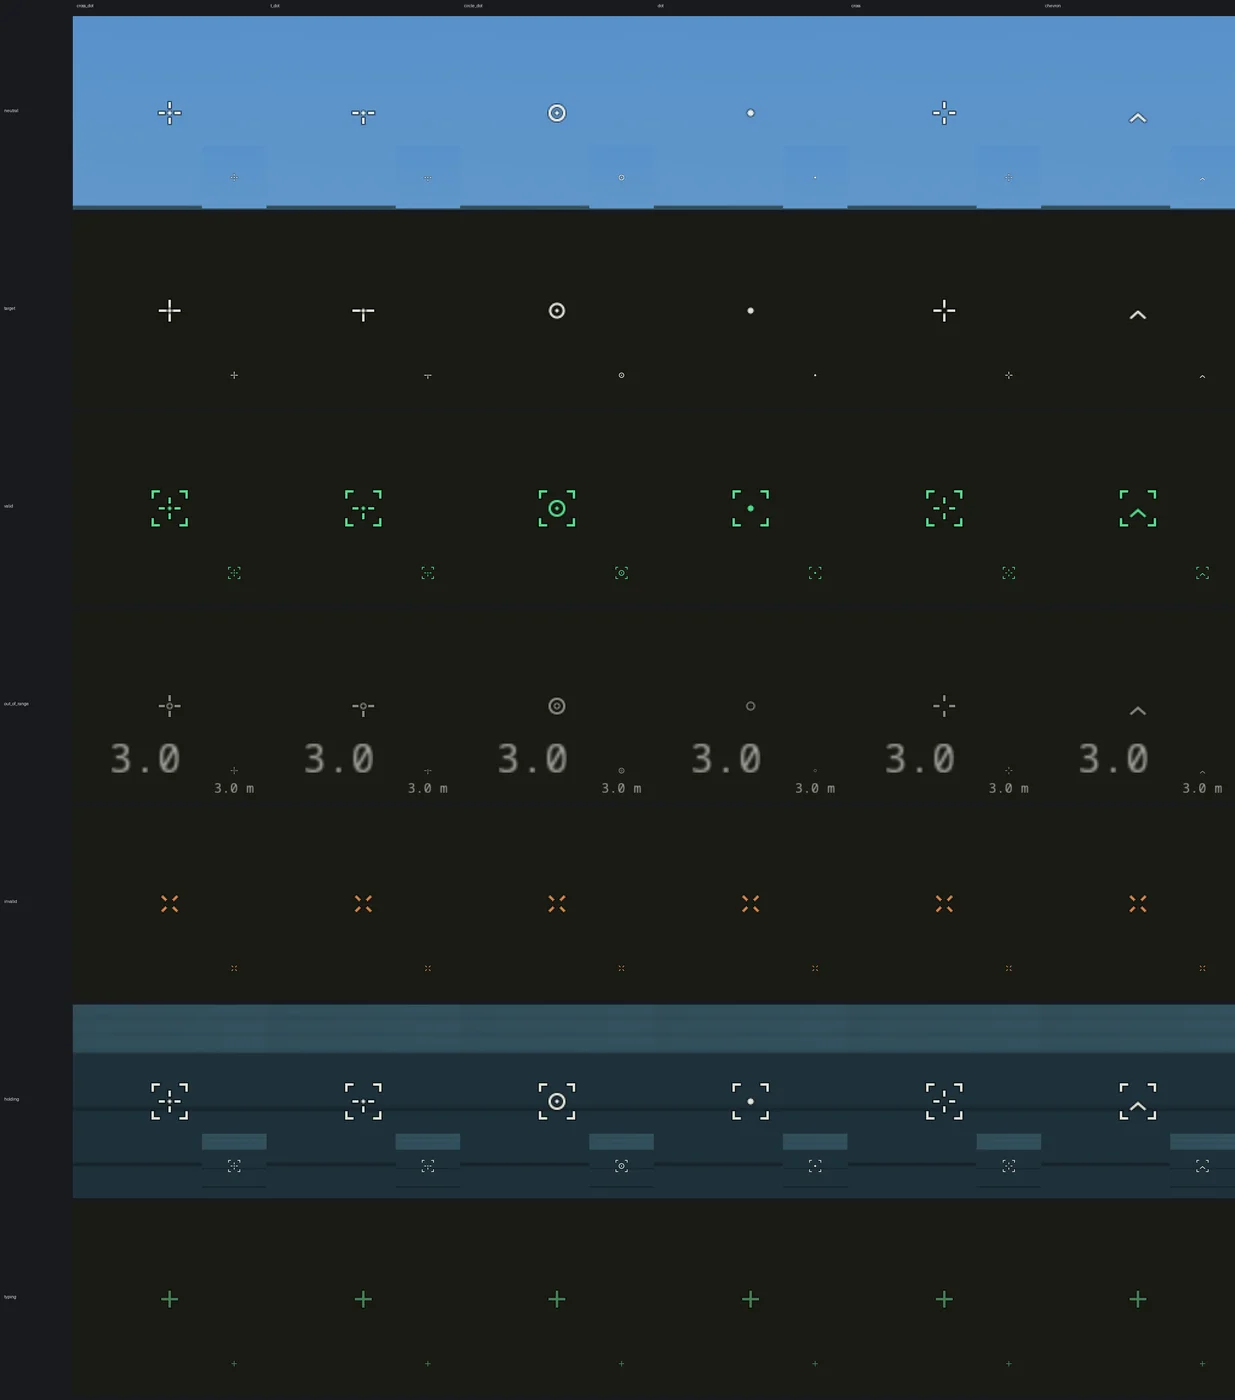
- Reticle: six styles, with size, thickness, gap, opacity, outline and colour. It opens up while you move and tells you what the current tool would do. A valid target gets corner brackets, a target out of reach dims and shows its distance, and a target that can’t take the action shows an x. Every state changes shape as well as colour.
The graphics setting Reduced motion turns off view bob and the moving reticle. All defaults and ranges are on the keymap page.
When something goes wrong
Section titled “When something goes wrong”- F12 leaves the world from any mode except free cursor. In free cursor, press Super+Tab or Back first.
- If the daemon dies, the plugin restores the desktop by itself (in 0.052 s in tests).
- If the shell crashes or restarts, it reconnects, renews its credentials and resyncs.
- U writes a private capture (a screenshot plus a JSON state dump) under
~/.local/state/hyprune/captures/for bug reports. In world mode the shell then asks why? Type a short note and it’s saved with the capture and collected incaptures/notes.md, so a round of testing reads as a list. The capture never waits for the note. Withcapture={watermark=true}in the plugin config, captures carry the Hyprune lockup in a corner; it is never drawn live.